Little Christmas socks: the pattern
Hello hello hello!
How are you today?
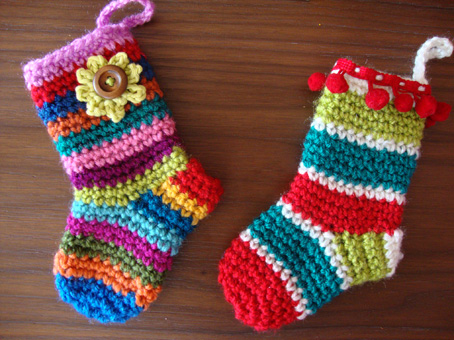
WWOOOOOOOOW! I am soooo thrilled by all your wonderful comments concerning the little socks:) Thank you so much! I could not make you wait longer so I managed to finish quickly the “how to” so I can share it with you today 🙂
It is very easy you’ll see but I hope that I’ll find a way to explain it to you by using simple words…
For these I used Nako Vizon a 100% acrylic yarn with a 4.5mm crochet hook…You can crochet with the yarn that you want but careful to pick up the right size crochet hook 😉
The socks are made using a single stitch (apart the beginning chain stitch (maille en l’air in french)) and it is: d.c (U.K terms) or s.c (U.S terms) or maille serree (in French)!

I’m gonna make with you step by step this one:

Here is a graphic pic to show you from where to begin and where to end with colorful parts:

I’m gonna explain it to you with pics 🙂 Don’t worry it is very easy 🙂
So? Are you ready? Did you prepare some yarn and a crochet hook? Let’s maaaaaake it ! yahooooooooo! 😀
I suggest that you make a sock with a single color to try out the pattern first and then you can make your own multi colorful one 🙂
For this one I used 6 different colors as show in the graphic above…
PART1:
Let’s begin with Part1 in the graphic pic (purple and yellow)
First (with the purple color) you begin with a circle of 4ch chain (4 mailles en l’air pour commencer)
R1: 10 dc (or sc) in the circle (10 mailles serrees dans le cercle)
R2: You crochet 2 dc in every dc of the previous round that make a total of 20 dc ( crocheter 2 m.s dans chaque maille du tour precedent ca fait: 20 m.s au total)

R3 to R11: 20 dc (20 mailles serrees) (R1 to R6: in purple R7 to R11: in yellow)

That make a total of 10 rounds of 20 dc. (purple and yellow colors part)

END OF PART 1
So? Is that ok for you so far? You just did the Part 1 🙂 bravo!
Let’s continue… shall we?
PART2:
R12: 10 dc (10 m.s) (With the dark blue color you crochet on half of the stitches of R11, that makes a total of 10 dc)
and you continue making rows of 10 dc until R17…
(avec la couleur bleu nuit crocheter sur seulement 10 m.s du tour precedent ca fait un total de 10 m.s)

You have now something like these pics above and down…
So R12 to R17: 10 dc (10m.s)

You just did PART2!

You have now something similar to the pic above.
After crocheting R17 you have to close and sew the right part of your sock (see the graphic pic at the beginning of this post : sew here after crocheting part2)
Apres avoir crochete PART2 fermer le cote droit de la chaussette par quelques points de suture (regarder le graphique du debut de ce post pour savoir ou)
END OF PART2
PART3:
With the turquoise color: R18: 22 d.c (22m.s)

For R18 you have to join together the dark blue part and the yellow part with a round of 22 dc (22m.s) as shown on this picture: (6 dc on the dark blue part + 10 dc on the yellow part + 6 dc on the dark blue part = 22 d.c )
R18: (6 m.s sur la partie bleu nuit + 10 m.s sur la partie jaune + 6 m.s sur la partie bleu nuit = 22 m.s au total )

and you continue from R18 to R 33: 22 d.c ( De R18 a R33: 22 m.s)

R18 to R22: 22 dc with the turquoise color (22 m.s)

R23 to R27: 22 d.c with the red color

and finally R28 to R33: 22 d.c with the pink color
You close your little sock by making a chain of 17 ch so you can hang it 🙂 (fermer avec une chainette de 17 mailles en l’air pour accrocher la chaussette)

You did it ! Your little sock is ready 🙂
You can embellish it by adding some buttons, ribbons or beads…

Ufff! It is done 🙂 I don’t know if I was clear enough for you to understand…do excuse me if no (this is the first time I make this kind of step by step pattern)

If you have any question, do not hesitate… I’ll be more than happy to help 🙂
Do not forget to tell me if you ever crochet these little Christmas socks I would really really love to see your own version…
Kisses to all!
and Happy crocheting 🙂
Sucrette
P.S: A small note for my french friends 🙂
J’ai essaye d’expliquer un peu en francais ce tuto pour les “french” ladies … Ma langue maternelle est le francais et j’ai beaucoup plus de mal a m’exprimer en anglais qu’en francais etant a moitie libanaise a moitie francaise donc n’hesitez pas a m’ecrire en francais ca me fait beaucoup plaisir 🙂 gros bisous!